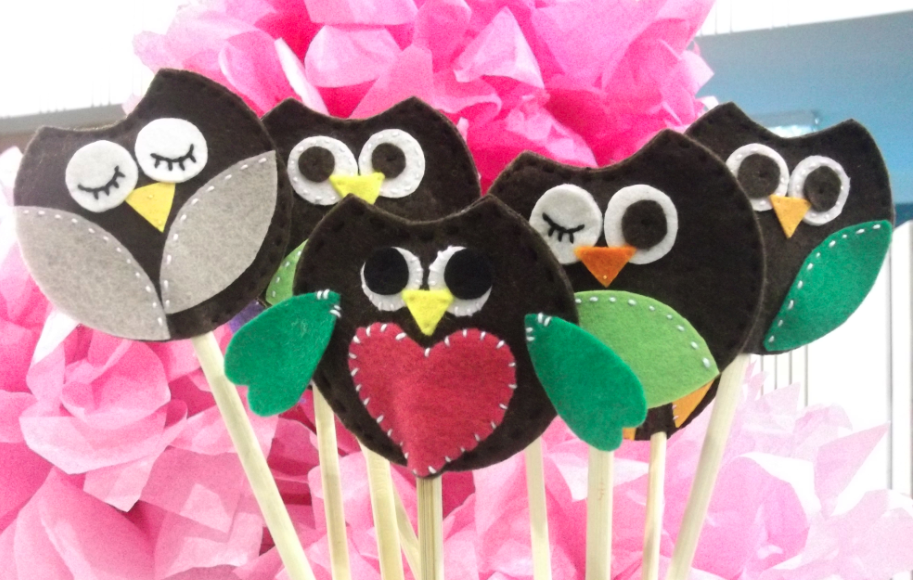
January 2, 2010 by Michelle
For most of December 2009, I was stuck in bed recuperating from surgery. When I had managed to finally sit up without keeling over during week 2.5, I began finishing up my holiday gifts.
I’m lucky I have friends who like quirky, kitschy stuff. All of these are feltie pins and I actually surprised myself with how well they turned out. The design choices are based on my friends’ personalities, the tooth being the only special request from the bunch.
Most of the felties are around 2 inches tall. A real killer for the fingers, I tell you. I also did some larger ones–around 4.5 x3.5 inches. It was fun to do and very simple especially if you’re used to working with felt. I’m quite a stickler for making the back part look as neat as the front, which contributed to my snail’s pace sewing. Best part were the reactions when I finally handed them out.
Here’s my first batch of feltie pins!


Tags: brooch, camera, cupcake, elephant, embroidery, felt, feltie, pin, robot, rose, skull, sushi, tooth
Posted in Fabric and Needlework | 2 Comments »
September 8, 2009 by Michelle
I found this wonderful and easy-to-do-and it’s-so-addictive craft tutorial where you turn a plastic bottle cap into a mini-pin cushion. I had fun with my first try and can’t wait to do a dozen more. I’ve been going around asking people to save their bottle caps. To learn how to make one yourself, visit Jen Segrest’s page by clicking here.
Here’s a look at my first try.

Photo by Domino Cid
Posted in Fabric and Needlework | Leave a Comment »
July 11, 2009 by Michelle

Been trying to keep myself busy these past few weeks. My baby, Java, went to her forever home in heaven. I’ve been working on a scrapbook for her and I’ll post that as soon as I have some pages to show. Crafting has been very theraputic, but it’s no real cure for missing her.
When her cancer had gotten worse, I took a two-week leave from work. While she would sleep—she did a lot of that in her last few months—I started on a needlework project inspired by an eco-friendly dog toy. It was a simple bird shape with a felt beak, wings, and tail. Then it occurred to me that the bird’s body looked a lot like a generic clutch.

So I started sewing. I love needlework, but I’m not very good with following patterns. I made this one up, mostly guided by simple stitches and a crazy game of “spirit of the needle”. Vist Mary Corbet’s Needle ‘N Thread for great video tutorials on stitches. I tried not to think too much of where the needle would end up next. After a few days, I was stuck and I was left with only the rear end of my imaginary bird completed.
The project’s been sleeping since Java passed. It’s been three weeks and I took up the needle again today. But before that, I sketched out what I wanted my bird to look like in my scribble book (my favorite ones to use are the papemelroti kraft notebooks).
I’m almost done with the needlework part of the Bird Clutch. I’ll line the inside with some sweet white and yellow polkadot fabric that I’ve been keeping. I’m nervous about putting this together on the machine.
Posted in Fabric and Needlework | Leave a Comment »
June 11, 2009 by Michelle
I don’t know about you, but I hate having to throw things away. I have an entire room dedicated to the you’ll-never-know-when-you’ll-need-it thingymajigs. These include cardboard tissue tubes.

With just some glue, newspapers, cheap tissue, paint, and cardboard scraps, you can make fun pencil holders. This is a simple project that I’ve taught at summer craft workshops for kids. Since it’s papier mâché, it requires a lot of drying time.
The tissue tube acts as the main receptacle for holding the pencils. First, cut a base—I tried flower shapes, others just plain round ones—from heavy cardboard (old boxes from grocery stores are what I used.) After attaching the tissue tube to your base shape with masking tape, start the papier mâché process. If you’re like me and you don’t want to cook up the traditional paste, just mix one part water with two parts white glue. I achieved the wrinkly texture by adding a final tissue paper coat—just slap on the tissue and with a thick paintbrush, dab the water-glue mixture until you have a pulpy texture all around.
The embellishments glued to the front were done the same way—cardboard shapes that were paper mâchéd. You can experiment with 2D designs like the frog, which was composed of pieces taped on top of each other (like you would with paper tole), before I started gluing layers of newspaper.
You can make all sorts of designs for this craft. My favorite ones were ladybugs with spread wings and pipe cleaner antenna. Those were the first to be filched by friends. I also made a purple spider with pipe cleaner legs that my sister placed on her desk at work. Her boss saw it and asked if he wasn’t paying her enough to buy a real pencil holder. Some people just don’t have any imagination…

Tags: cardboard, Papier Mâché, recycled, tissue rolls, tissue tubes
Posted in Papier Mâché | 2 Comments »
June 10, 2009 by Michelle
I love clay, dough…if you can mold it, I’m all over it! The letters and shapes on these projects were made of simple homemade playdough—the kind they make at preschools. Then I used cookie cutters to form the shapes (I use the plastic Wilton 101 Cookie Cutters, a massive collection of numbers, letters, and even dinosaur shapes). A few days of air drying and you have your very own clay appliques! The playdough recipe I worked with didn’t take to oven drying. Best to do it during a warm, sunny day. I made a batch of appliques during the rainy months and it took forever to knead, get smooth, and dry evenly. You can use regular wood glue to attach the appliques to the boxes.
After adding the basecoat and designs to the appliques, don’t fo
rget to coat them with water-based varnish to keep cockroaches from eating it. The boxes are regular 3×5 inch wood recipe boxes you can get anywhere, while the wood tissue box was something my mom had lying around.
I used water-based acrylics to embellish the projects. Polka dots were care of pencil erasers and the handle ends of my paintbrushes.
I love how the lines and dots are uneven and seem to have a mind of their own. I nicknamed these projects Mi Abuelita Loca—it just reminded me of that one crazy aunt we all have who’s loud, a little unbalanced, but a whole lot of fun.
Tags: boxes, clay, paint, playdough, wood
Posted in Wood & Paint | 2 Comments »